Showing posts with label refashion. Show all posts

Monday, 10 November 2014

DIY Simple Skirt Alteration

Everything has been on hold for the last few weeks, life is too busy and I have a horrible condition that means I am unable to say no to anything. ever. it is not always a good thing...

My craft room looks more like a dumping ground as I have stacks of pre-washed fabrics ready for projects which I don't have time to do. But,  have managed to register as a small business and revamp my web site in the hope that, with a little (lot) of time and effort, I can start making some money. It is that or a normal job, I know which I would prefer (especially since I have no idea what I want to do when I grow up, I really should decide I am 34 in 2 weeks...)!

I have managed to squeeze in a tiny bit of sewing. I sewed a hem!!


I got this pure wool tweed skirt at a flea market last year (£3)  and it has been sitting patiently waiting for me to shorten it.


Well, it's time came and, using a skirt I altered last year, I cut it to length, pressed it, then hand sewed the hem. I used to hate hand sewing hems but I actually loved doing this hem and it looks so much better than a machined one.


The skirt looks a longer on than I thought I might shorten it a wee bit more!

Off to schedule my week in my google calendar, that way we might have proper meals this week...!


Monday, 15 September 2014

Super simple blouse alteration

There seems to be a trickle of unwanted clothing in to my house at the moment and it is stressing me, my suitcase of items to refashion has turned into a suitcase + a pile by the bed + a pile by the sewing machine!

Then main source of the clothes is my Mum. She is a clothes fiend and my constant gently nagging about cheap clothes and the poor people who make them is not working all that well... When she decides things don't suit / fit properly, I can't bear to see them wasted. Someone has made these clothes, some almost certainly earning below a living wage, in factories where the conditions are awful, so I think it is my duty to at least wear the clothes.

My Mum is a couple of sizes bigger than me so everything needs altered. I started with the easy things, the first was a blouse.

It started very baggy and making me look massive!


All I did was take it in from the upper arm then down the side seams. I kept it loose so I can comfortably wear a top underneath, it is very sheer!

It is still not very flattering but fills the 'smart/casual evening' gap in my wardrobe nicely, in fact it had its first outing last night!

Now for the next thing, a pair of jeans.


Linking to some of these parties.

Tuesday, 5 August 2014

Refashioning my favourite handbag.


About 5 years ago I asked for a purple handbag for my birthday, I got a gorgeous bag from my Mum and used it loads until earlier in the year when it ripped.


Unfortunately I didn't catch the rip in time and it was unfixable but the bag was too nice to just get rid of and there was a lot of leather there to work with, another bag was definitely in order. Realistically a cross body bag is far more practical for my life at the moment so that is what I decided to attempt!


The purple suede had gone a bit brittle so I only used as much as was necessary to keep the pockets. The rest is made up of the back of the bag and I reused the lining.


It was really hard to make the first cut , I had never sewn leather before and knew this could have gone horribly wrong, but it went smoothly, the only pain was inserting the top zip. My machine was not particularly happy with the bits where the tabs for the strap attach - 3 layers of leather and a zip was pushing it a little, so there is a little glue holding some dubious hand stitching in places :)


I have been using the bag for a couple of weeks now and it has held up to life so far, hopefully I can get another good few years with my purple bag and who knows what it will turn into after that!


Linking to some of these link parties!

Sunday, 8 December 2013

Tartan Skirt Refashion

I have been wanting to get a tartan skirt for ages so when I found a 100% wool skirt for £7 on ebay I jumped at the chance! I forgot to take any before photos but imagine a below the knee pencil skirt that was about two sizes too big! .


Now it is an above the knee pencil skirt that I love (not sure why there is a funny sticky out bit on the right, must be the way I am standing)! The skirt has a centre back zip so taking in the sides was easy and then I re-hemmed it at a better length.


It looks a little crushed in the photos, that is what 2 days in a row wearing it does :)

A final photo, this is what it looks like when it has just rescued a tree that has fallen over and deposited most of the decorations on the floor...(the innocent looking little girl was not innocent)!


Off to re-decorate the tree now...!


linking to some of these fab link parties!

Friday, 19 July 2013

Shapeless top to Summer Skirt


I acquired this top when my sister was having a clear out ages ago.


I knew it would be easy to make it into a skirt but didn't see the point when we never normally get much summery weather and I really didn't need another hardly worn summer skirt!

This summer has been the exception so far though, glorious sunshine for 3 weeks now and it is not looking to end soon so the top has been brought out of its 2 years hibermation in a suitcase under the bed ready to be made in to a skirt.

I cut off the straps, re stitched the band at the top that was now the waist band, then took in the waist a little and I had a fab new skirt with ready made button closure!


One of my favourite summer skirts now. Long may the sunny weather continue!


Linking to some of these fab parties!

Tuesday, 25 June 2013

DIY Formal Shirt to Cushion Cover

My first formal shirt refashion was a shirt to blouse, this time it was a lot more simple!


I got an old shirt from my Dad, dyed it turquoise, then cut it under the arms. I placed my cushion on to the shirt, drew round it, then sewed it to size, making sure the ruffles and buttons were centred (the buttons are the cushion opening).


I then trimmed the seams and turned it the right way out and popped my cushion inside! Simple. It is a light weight cover so wouldn't be suitable for a sofa but for decoration on our spare bed it is perfect.


Linking to some of these fab linky parties!

Saturday, 16 February 2013

DIY Mens Dress Shirt to Ladies Blouse

I have been hanging on to my husband's shirt he wore for our wedding for the last (almost) 10 years. It wasn't new when he wore it for our wedding (we were broke, my parents paid for the day and we didn't want to waste money on things that didn't need replacing) , in fact I think he may have worn it when we went to our school prom together... Anyway, after the wedding and another couple of formal outings its collar and cuffs were not longer presentable. He wanted to throw it out, I wouldn't let him, so it has sat in a suitcase under our bed since then....

Now I am drowning in a sea of fabric and old clothes and am desperately trying to deal with my stash so decided to have a go at refashioning it into a blouse for me.

I placed a blouse that fits me on top of the shirt and drew round it (not the sleeves though).

I then forgot to take pictures, but cut the shirt out, sewed up the new shoulder seams and put the blouse on my dress form and drew the new neckline. I then used another old shirt to make facings for the neck, sewed them on, then top stitched round the edge.

I put in bust darts and shaped the sides of the shirt.

I then cut the arms of the shirt roughly where they fitted then new size armholes. I attached the sleeves, gathering them slightly to fit, then cut the sleeves to the length I wanted. I finished them by putting two bands of fabric (that were just a wee bit bigger than my arm) round the bottom and gathered the bottom of the sleeve to fit.


Finally I have a blouse that fits!

Tucked. I cut my head of for your sake, it was a gruesome picture :~)

Untucked. It is bad when the best photo is one of you trying to get something out of your eye...
I made the skirt I am wearing in the pictures last November and used a vintage pattern.  I had to increase the size of to accommodate my large waist, forgetting that it maybe wasn't the best time of the month to be taking measurements and making skirts... So, before Christmas, the skirt fitted for one week a month and now I have lost some weight it doesn't fit at all. I am going to have to eventually take it apart and re size it but until I have reached my target weight it will remain cranked in at the waist with a belt looking totally unflattering!!


Linking to some of these fab linky parties!

Monday, 31 December 2012

Popular posts of 2012

2012 has been a crazy busy year,lots of DIY and gardening and not nearly as much crafting as I would have liked, hopefully next year will be less house renovation and more crafty fun!

Here is a roundup of my 10 most popular posts of 2012...

1.  DIY Dip Dyed / Ombre Skirt

 2. DIY Swarovski Earrings


3. DIY Swarovski Bracelet


4. Woodland Wonderland Tree Stump Wedding Cake


5. Wooden Bead Necklace


6. Star Wars ATAT Cake


7. Skirt from Scraps


 8. DIY: old jeans to new skirt


9. Pintrest Inspired Foot Art


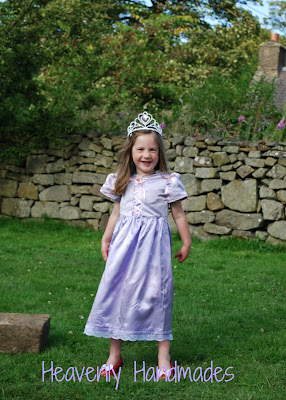
 10. Rapunzel/Tangled Dress Up Costume


Looks like jewelery and refashioning posts are most popular, more of that next year then!


Thursday, 26 April 2012

Skirt from scraps!


Does anyone else have a mother in law who seems to shorten every skirt she ever buys?? I do, and I got a load of off cuts from her in February. Luckily my mother in law goes for quite full skirts so the off cuts from the bottom were long and thin, perfect for making a tiered girls skirt!

This is how I did it, photos are not great, sorry:

Take 2 offcuts, either from the bottom of a (fairly full) skirt or 2 long strips. I had one lining strip and one patterned.

Cut the patterned strip in half to make the two tiers then cut the lining one the same length (the fullness of your original skirt will determined the fullness of the final skirt..)

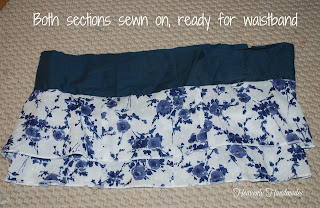
Sew the short ends together to make 3 tubes of fabric.

My plan was to use the lining as the waistband and to attach the patterned fabric to.


With the lining the right way out I attached the first tier, right sides together but with the patterned tier upside down so, once sewn to lining it would be folded down to disguise the seam.
 
I then used the same method to sew the second tier on. The spacing of your tiers and placement on your lining fabric will depend on how long you want the skirt. My first tier was about 2 inches from the bottom and the second was right at the bottom. 

For the waistband I finished the raw edge ( I serged/overlocked it but you could fold then fold again) then folded over about 1inch as my elastic was just less than 1 inch wide. I inserted it in the usual way and sewed up the gap.

Then press the tiers down and attempt to get someone to model it for you...


I made another one in the same way, little e did not like it as much...


Whether she will actually wear either of them is another question, she really does not like leggings or tights which is not ideal since we don't live in the warmest place in the world....!


Linking to these fab linky parties!
Recycled Fashion